Wednesday, January 30, 2013

Preview of Yoki's original costume design


Since my costumes are ready and packed away for Frostbite, the last two weekends we have focused on Yoki’s original character and her costume design. Fuyu Jaw're, the character Yoki chose is from the same storyverse as Sio Imano, a character she dressed as at last year’s Tracon and Neva Imano introduced at Desucon.

Yoki had a clear vision of the costume and the materials when she started the project. Everything had to be “real” looking, in sense on natural materials and no shortcut fastenings with Velcro. When we started to draft out the costume, it felt like making and planning a stage costume rather than a cosplay one. But naturally when there is no character sheet with visual appearance, it had to be created through a back story, personality and values.

Because Yoki has busy, busy study schedule before Frostbite, I'm writing this post from the costume construction on her behalf.


The costume Yoki had created in her mind has actually three to four layers, depending on how they are counted; an under suit with leather tabard, a full length robe, a belt with chain accessories and a capelet with a high collar. The components could be worn in different combinations, like tabard over the robe or the under suit with capelet etc.


The robe is drawn based on the pattern we made for our Snowtrooper dusters with few adjustments. The hem is long with an opening over the left leg. The sleeves are wider and few centimeters longer. The bust is the same, but it fastens with small buckles instead of Velcro. The material is off-white linen with pale blue viscose lining.


The capelet was drawn over basic pattern with two folds on the back. It’s made from dark blue velvet, blue viscose lining with silver pleather trimmings. The capelet fastens with similar buckles as the robe.

The belt has satin band with a metal ring on as a decoration and lacing on the back. The belt is supported with two layers of iron-on interfacing and plastic boning next to the eyelets.


The under suit is just a basic, sleeveless top with two piece “skirt” from dark grey linen. The skirt part is constructed from two separate rectangular shapes, front and back, which attach to each others with small buttons forming one sophisticated loincloth.


The tabard is made from silver fake leather with fabric interfacing and viscose lining. The front is constructed from over 30 individual strips. On the back is lacing with plastic boning. Connecting the front and the back is three bands of pleather on each side.  


The wig is silver grey, almost waist length beauty. It doesn’t need styling more than combing, some balsam spray to keep it from tangling and hairspray to set everything so that Yoki won’t have a mental breakdown with all the hovering hair strands.

The base make-up is rather basic; foundation, fixing powder, eye shadow, mascara and eye liner. The turquoise triangles on the temples were painted with Grimas water make-up and fixed with transparent powder. The eyebrows were our major concern. We were worried that we couldn’t get them light enough to match the wig. We thought of using the glue stick- acrylic paint method. because Yoki’s eyebrows are dark. But we had to give up the idea, because we wanted to keep the look natural.


In the end we went with white khol, which actually worked really well. Even if the real color is slightly visible, it fits to the darker shades on the wig. Or then we just happened to have a suitable lighting. At Frostbite the finishing touch will be turquoise contact lenses, which are the same brand as my green ones. So another lens color review coming next month with hopefully loads of photos from the costumes and from Frostbite in general!

Wednesday, January 16, 2013

New costume completed for Desucon Frostbite

As I stated earlier, I have a new costume to debut on Desucon Frostbite. I was hesitant to reveal it, since first time in my cosplay history I chose to order a prop instead of making one and I wasn’t sure if I’d ever get it. It was nerve-racking to wait for the shipment. I don’t know how people do it. I had to check the site every day twice for any new information on the shipment schedule.

My long wait, three weeks of agonizing anticipation finally paid off last week, when Yoki claimed the packet from the post office. Yoki did it, because it was actually ordered by her as a Cristmas present for me. Three words: best present ever!

Before I reveal the character, let’s play a little game. I bet this is an easy one, but I’ll give it a go. I will list photos below from props or garments the character has. Feel free to quess who it might be.


The shoes for the character are actually the same I'm going to use for Alicia. Originally I bought them for flee market without any particular character in mind.


The wallet is made from scrap pleather I had. The transparent plastic is something that can be used over tablecloths or in make-up pouches. We have used it for making stencils.


It's a fez. I bet I have mentioned that I love making hats, so I just couldn't resist. The fez is made from iron-on fiber fabric, batting, black lining and burgundy twill.


And this is my present! Big thanks to Yoki! The Eleventh Doctor's sonic screwdriver from Forbidden Planet.


The character is the Eleventh Doctor from Doctor Who series as a female. Naturally, because even if there is some similarity between me and ever so intriguing Matt Smith, I really can't say that I look like him. Someday I might try to get Yoki to portray the Tenth, because the similarity between her and David Tennant is most certainly there

Also a female version gave me rather free hands for redesigning the Doctor's outfit. I wanted to keep the costume bit childish and fun, but also smart.

The jacket is waist length with shoulder patches. The shirt is rather regular dress shirt I made based on a basic shirt pattern. The fabric is light pink with burgundy pin stripes. It was the closest I could find to the original. The skirt is graphite grey wool mix with half circle, over-knee pattern. The bow tie I made from some left over cotton satin I had and the suspenders I bought from local department store.

The wig is few years old. I just haven't had chance to wear it yet. I wanted to keep the hair style short and tomboyish, even if my first option was long and curly. Somehow the short hair seemed to resonate more the feel of the character. With long hair the outcome was too lady-like and mature.

Sunday, January 6, 2013

Desucon Frostbite within sight

First convention of the year 2013 is approaching steadily. Desucon Frostbite will be held at Sibelius Hall, Lahti for the second time in mid-February. We are going to recycle a bit and have two new costumes to debut. Even if our blog have hibernated through these cold winter months, we have been productive at our workroom!


First costumes are from Moomin TV series. Yoki will wear Snufkin, which dates back to 2008 and I’m going with my "new" Alicia costume. I’m currently adding some wefts to the wig to make it fuller and slightly longer. That is actually the only update the costumes need.


The second costumes are from different sources. Yoki is crafting an original character costume from her stories with white robe and blue capelet. She will also be wearing a white wig, her ultimate pet peeve. Thanks to my hoarding abilities, we had a perfect color and style on our storage for the costume. There is still work ahead with the undergarment, but I'm quite confident that everything will be ready in time.

I'm still not sure how my second costume will turn out or rather if I get one important component in time, so I'm going to get back to that later. But if everything goes well, the outfit will be cool!

Even if Yoki’s costume is still under construction, we were able to fit the robe. The pattern for the robe is altered based on our Snowtrooper dusters, only with different cut on the front and slightly wider sleeves. Yoki put on the robe and then suddenly… cosplay.


We both burst into laughter. With her new haircut Yoki looked exactly like a character from a comic book we’ve had for ages! Well, for twenty years or so. We had to dig up the comic for comparison. Does anyone else have weird moments with accidental cosplay?

Tuesday, December 18, 2012

About contact lenses and sort of a review


For me contact lenses play an optional part in cosplay. I think a lot of cosplayers also see they as fine tuning or matter of engaging to the hobby rather than absolute part of the costume. Since I use glasses every day at work I thought that getting a prescription contact lenses wouldn’t hurt. Especially as regular cosmetic contact lenses I’ve used during my cosplay years don’t seem to fit, I had two reasons to make an appointment to my optician. The person prescribing should be licensed optician, optometrist or an eye doctor.

What the optician does in the first sitting with a new contact lens user is somewhat the following; asks questions about health and need for lenses to map out what type of lenses would work best and examines the eyes with a microscope for correct base curve, prescription and possible astigmatism. Then optician gives instruction of how to insert, remove and care for your lenses. The optician picks the pair of lenses based on the examinations and checks that the lenses fit properly on the eyes.

The prescription should have information about your eyes (diopter powers, base curve, diameter), lens care instructions, the date, the period of validity and the name of the optician

The cost of the first lens fitting in Finland costs varies from 15-40. Sometimes the fitting is free if you make an order for lenses at the same time. Even if you order lenses online, I recommend getting a prescription. Even if the probability is low, some people are not suitable wearers of contact lenses. It’s the job of an optician or eye doctor to give the green light and find the perfect lens type.

Base curve, diameter and power clearly visible in the package.
 
Buying from well known manufacturers or checking the seller’s site for detailed information about the lenses is really important. If the seller uses names or registered trademarks without any word of the manufacturer or the basic info about the lenses, including the base curve, diameter or safety instructions are nowhere to be found, it’s probably better to find another site to buy from. The seller should also provide information about wearing, removing and caring for your lenses from wear schedule to suitable cleaning solutions. Most sites also list the water consistence of the lenses, which is almost straight forward guide to the comfort level of the lenses.

The markings on the cases were added by absent minded cosplayer, who wanter to make sure that lenses would be worn in correct eyes.

I decided to buy my first pair of lenses from the optician, since they sell only genuine products. I chose one-day lenses, since I only need or want to use them time to time. With one-day lenses I can skip the lens care totally, so it’s hygienic and easy.

Even if I fitted one-day clear lenses I wanted to order tinted lenses. I ended up with “single wear” products from Starlens. They are one-day contact lenses which tinted all over, meaning that they don’t have a “hole” in the center for the pupil. And since they are only tinted, they work best with light colored eyes. The lenses looked so interesting that I had to test them. One package with two lenses was about 11 euros. An they are non-toric. Toric lenses for antigmatism are bit more expencive and they usually month or year lenses.


The Starlens Biomedics 1-day has six different colors; blue, brown, green, violet, mandarin and turquoise. I chose green to be tested first, because I have two green eyed characters chosen for Desucon Frostbite.


The water consistence of the lenses is 52% and they felt really comfortable. I forgot that I was even wearing lenses. And since the lenses were tinted, not opaque or printed, the outcome was natural. My eyes are light blue and the structure of the iris is clearly visible with the lens. Behold the scary eye!


I was skeptical about seeing everything in green, but the world looked rather normal when wearing the lenses. The brown ones might dim the vision a little, more so if they are worn in the evening or in dim lighting. But I think that is something I could live with, since the lenses were so comfortable and I liked the outcome.

Of course in cosplay purposes they might not always work, since some characters have true BAZOOM-effect on their eyes or the color or design on the eyes is really distinctive. But for characters with “normal” eyes or when the eye color just doesn’t match with the cosplayers eyes and the change doesn’t need to be dramatic, I recommend these lenses. I’m going to wear the lenses for Alicia for example. No BAZOOM needed.


Monday, November 5, 2012

Saya Otonashi from Blood+ at Tracon 7


I actually do have proper entries under construction. I really do!  As soon as I get an opportunity I will write about contact lenses. I recently bought ones with prescription and did the whole optician routine by the book. I have worn cosmetic contacts as long as I have cosplayed, but it took me this long to go to optician and check if my eyes are even compatible with lenses. But since I can't wrap the experience up just yet, I just keep spamming photos for now.


Saya is actually the only costume we both have worn. We are pretty much the same size, so I didn’t have to alter the costume to fit me. I only had to turn the skirts waistband over, so that the skirt “shortened” a little; my torso is taller than Yoki’s so the height proportions of the skirt and the jacket didn’t mach. It was an easy fix.

I really don’t have much more to say about the costume. It was effortless costume to wear on the second day of the convention, regular make-up after the troll blueness and perfect for changeable weather conditions, since its water- and windproof.


Sunday, October 21, 2012

New cosplay and photoshoot- Alicia from Moomin


Even if I thought to have a break from costume making after Tracon, I just couldn’t. This year has been our most productive year this far and there seems to be no end to it. The main point for constructing Alicia/Aliisa costume was to make a mash-up revolving around a theme of Zombies at Moominvalley for Halloween. Instead I fell in love with the regular costume so bad that I had to have a photoshoot starring Alicia. The location was our neighboring forest. Yoki acted as the photographer.


 The costume wasn’t complex to build. I borrowed Yoki’s patterns for Snufkin as a base for the shirt and dress. The tights I found from local department store and the shoes are drifted ages ago for unidentified costume purposes. They were so cheap that I had to buy them… Thank you, my inner cosplay hoarder. The pendant is left over Fimo, gessoed and painted pink.


The wig is from a Finnish masquerade store and I used it for Lumiere earlier this year. Its bit thin to be worn loose, but I have solution ready.  Again thanks to my hoarding spirit, I found a pack of straight kanelon fiber from my closet in the exact color of the wig! So if I ever wear Alicia to conventions, I’ll be making wefts for some thickness.


Tuesday, October 9, 2012

Casting with Formaform


When I was constructing the troll costumes, I wanted to try something new in form of casting and mold making. Both of our trolls have harnesses with buckles, so I ended up casting the fastenings from polyester in a Formaform mold.


Formaform is a synthetic and elastic rubber material for mould making. I bought the smallest package, 1,25kg from Hobbypoint, Finnish crafting store. The package contains three different ingredients; granules, liquid and Thermolan, a type of a hardener.

The granules smells pretty bad, but its environmental friendly and you can use it over and over again by cutting it to pieces and melting it again. Nice plus if you haven’t made molds earlier and mess up the first ones, like I did. I think the process pictured below is my third try. Read the instructions well beforehand. You never know, if I cut some corners.


First you need to prepare the working space. What you need is a stove and a retired pot, a scale for measuring, wooden sticks or spoons and cardboard cups. Then you need a container for the mold. I used a juice tetra which I cut in half and strengthened with tape. The master piece is taped to the bottom of the contained with two sided tape. The wall of the mold should be at least 6mm thick. That should be taken inconsideration when choosing the container.


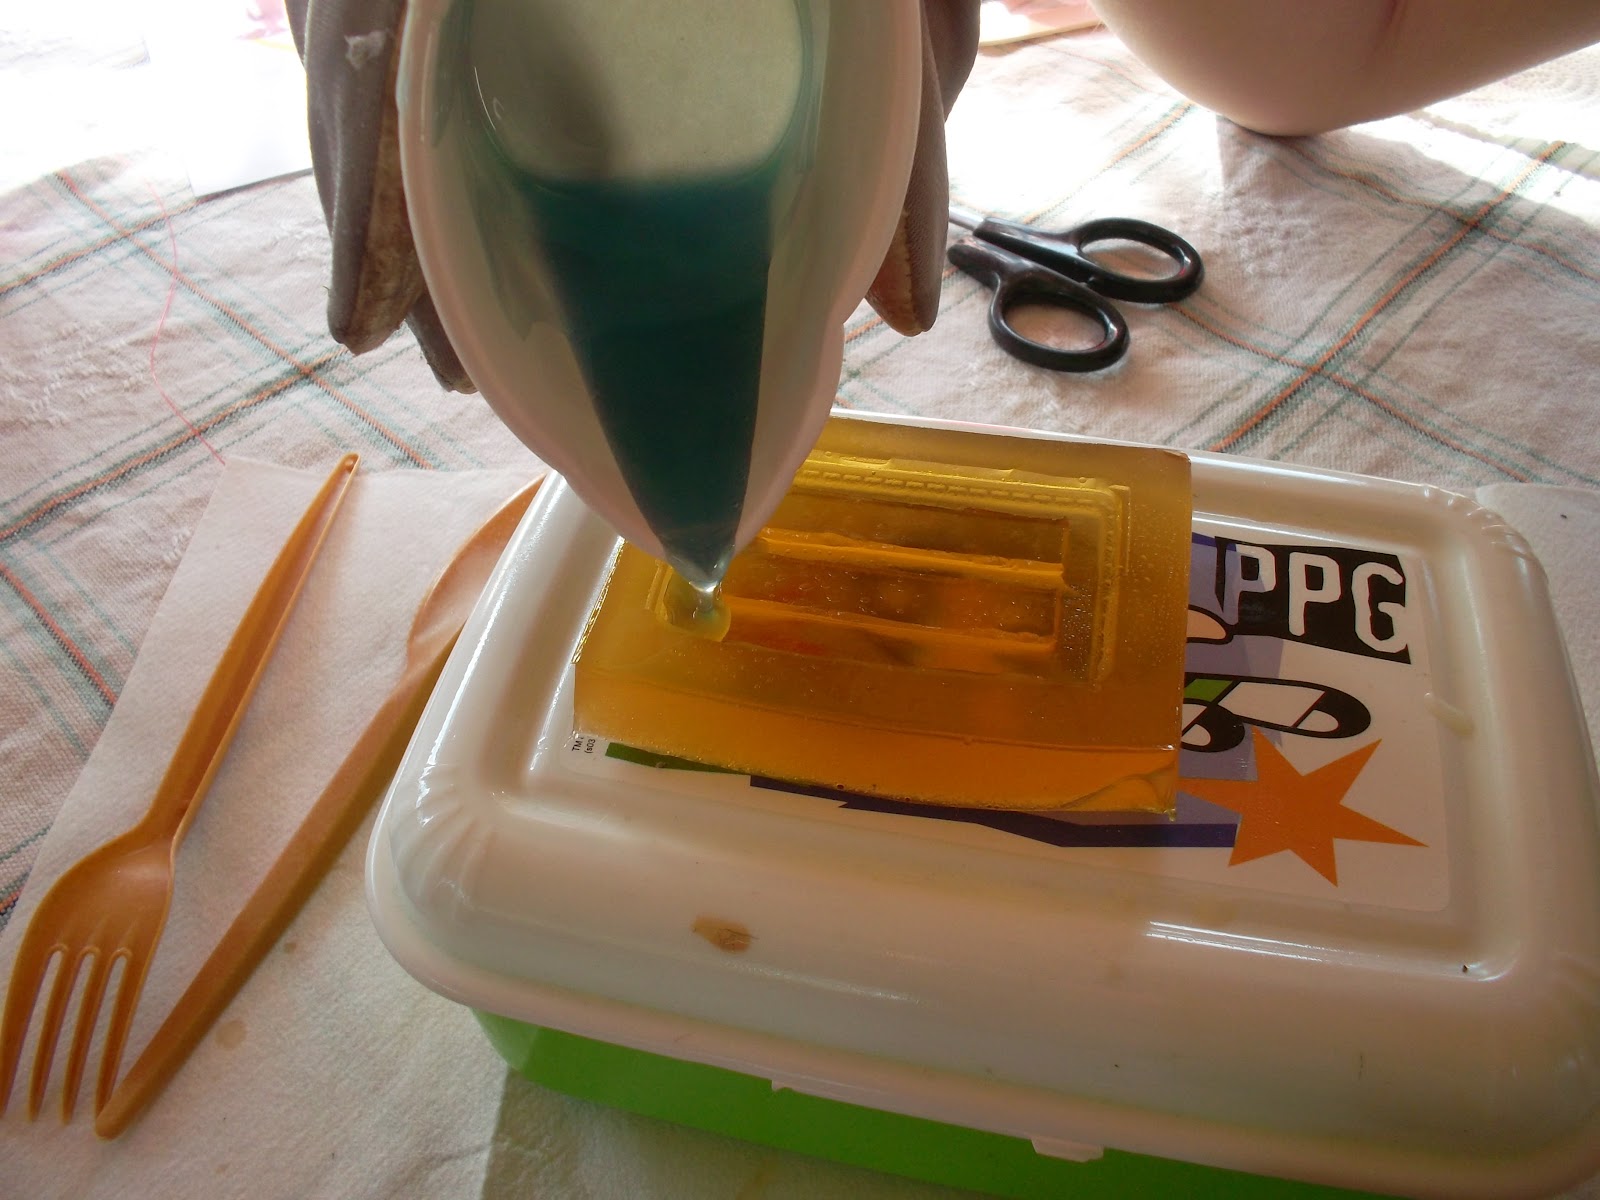
Before I started to melt the Formaform, I sprayed the master with silicone spray. Then I measured the ingredients; granules and liquid in ratio 100/40. I turned up the stove to medium heat, poured the ingredients in and started to stir carefully with a wooden spoon. You don’t want air bubbles. The stuff is ready as soon as it turns liquid. 


I poured the stuff on the mold container and checked the master’s surface for any air bubbles. I pushed the bubbles out gently with a paintbrush.


Then the mold needs to set. The time depends on the size of the mold from half an hour to hour. Formaform will turn rubbery. When that occurred I carefully removed the mold from the container and pulled the master out. I trimmed the edges and check the mold.


First two molds weren’t good enough, so I just chopped it up and melted it again. The third one was almost perfect, so I let the mold cure 12 hours before the next step. At this time the mold will lose some elasticity, but remain rather flexible.


 Because I was using really strong, industrial material for the casting I had to reinforce the inside of the mold. Otherwise the polyester pull would tear the mold apart. Formaform comes with a bottle of liquid that is used to make the mould heat resistant. It hardens the inside of the negative mold so that it can endure materials like resin and hot wax. 

I poured the liquid on the negative and let it set for ten minutes. Then I just poured the stuff out and let the mould cure until the inside had felt solid as the rest of the mold remained rubbery.


Then it was time to mix polyester filling with hardener and pour it into the mold. I recommend using a respirator and pair of gloves when working with irritating stuff. If possible work in steady conditions, in room temperature if possible and not in direct sunlight if you don’t want to ruin your cast or the mold itself. Again, been there, done that.


It took about 45 minutes for the polyester to cure to a point it could be pulled out of the mold. I let the buckle to harden overnight, trimmed it with utility knife and painted it.


In all, it was nice challenge to try something different and because I needed a handful of buckles, it was more affordable to cast them than buy them. And now I have materials for future projects. But next time I’m going to buy more suitable casting material, since the polyester filling I used was bit too strong for Formaform. The last pull I did tore the inside of the mold pretty badly.

If you want more information and approach to mold making, check Rullarinkeli’s blog. Instead of Formaform, she used Vinamold. And there are videos too!